Using IBExpert and Delphi applications in a Linux environment, accessing Firebird
<< Distributed applications with Firebird | Database technology articles | Bidirectional replication for InterBase and Firebird >>
Using IBExpert and Delphi applications in a Linux environment, accessing Firebird
By Luiz "RedDevil" Stefanski.
(Revisions by IBExpert)
Initial topics
Before writing this article I performed tests in a complete installation of the Conectiva Linux version 10 without the 4th CD (the Update CD), so I had no problems with dependencies, except with WineTools. I therefore installed the packet/libraries "gtk+-devel", X-dialog and glibc. The version of Wines used for executing IBExpert is 0.9.5. I did not test Delphi applications with this version of Wine. The Delphi application executed fine with Wine version 20041019, but when using Wine version 0.9.5 I detected the application’s screens were not displayed correctly, or maybe it depends on some extra configuration I have not yet discovered.
Introduction
Linux is being used in homes and enterprise plants all over the world; Linux is gaining hold and growing all the time, not only in server installations where it is sacred, but in desktop installations too. Therefore it is unavoidable that developers will have to have contact with the Penguin at some time.
When this happens a good developer will discover that Linux is not a monster, principally because Linux has made a lot of transformations and now it is much friendlier for the end user.
Talking about Firebird: they have a native version for Linux, but we can also manage and develop applications to run in Windows accessing Firebird in Linux. One example of such a management tool is IBExpert, and executing IBExpert in Linux. We can do this with a lot of applications developed in Delphi (Windows).
There is a lot of software emulators for Linux, like DosEMU and WABI, this software make DOS applications and Windows 3.1 applications execute on a Linux platform. To execute IBExpert we will use one of the best ways to do this: WINE (Wine Is Not an Emulator). The name itself affirms that WINE is not only an emulator. It maps and converts calls in the Windows API to the Linux API, this way the Windows programs are actually deceived, because they "think" they are being executed in Windows, but are actually executing in a virtual Windows called Fake Windows created by WINE to execute in the specified Windows directory (~/.wine).
Download and installation of Wine
In this article we use the version 0.9.5 of Wine, the last version is the version 1.0 (you can see this in the WINEHQ (https://www.winehq.org/), the official site of WINE, the version 0.9.5 is however sufficient for us. Maybe the early versions of Wine execute the Delphi applications better, but I tested IBExpert with version 0.9.5 of Wine and it works fine. This is also the nearest version to Wine 0.9 – Beta, the preferred version when using WineTools 0.9, and for the front-end we will install some Microsoft Windows components in our fake windows, - very important in order for the software to work smoothly in Wine.
If you are an advanced Wine user you may prefer to use the early versions of Wine or install the Wine version for your Linux distribution. If you want to do this, use the link for Sourceforge and track the steps beginning the installation from the archive.tar.bz2. You can download this file from a multitude of mirrors (see table below). This is not of interest for newcomers.
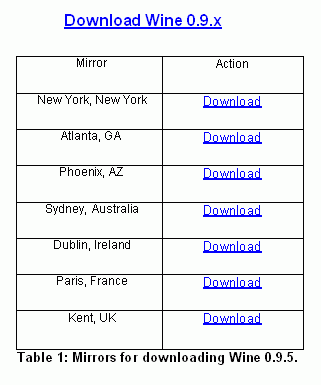
Important: When I wrote this article the latest version of Wine was version 0.9.5. You can however now find newer versions. Wine offers retrocompatibility, and this can work the same way. By only changing the names you can adapt the scripts to new versions.
After downloading the wine-0.9.5.tar.bz2 archive, we need to compile and install the Wine. So you need to log in again as root user and move the downloaded file to directory /root. Open a new shell and type the comands:
 [root@hades root]# tar -jxvf wine-0.9.5.tar.bz2 [Enter]
 .
 . (list of unpacked files)
 .
 [root@hades root]# cd wine-0.9.5 [Enter)]

 [root@hades wine-0.9.5]# ./configure [Enter]
The last comand may be delayed some moments.
Following completion type in the same shell:
[root@hades wine-0.9.5]# make depend && make [Enter]
Now, the next instruction will be delayed... This depends on the CPU used. I suggest you go drink a coffee, or read a good book until the compilation finishes! After this we need to install Wine by typing the instruction:
[root@hades wine-0.9.5]# make install [Enter]
If all works fine, Wine is now installed and ready for use.
Do not run IBExpert (if you already have it installed) before carrying out the next steps. If you have done, you may need to delete .wine.
Download and installation of WineTools
WineTools is the front-end used to manage our fake windows; this tool will install the software and components necessary for Windows programs run inside Linux.
As I already mentioned, we will use the version winetools-0.9, the download can be done in 2 ways:
- If you prefer the installation in a
RPMpack, select it - If you prefer to track all steps and use the
archive.tar.gzcan download it from the link below.Downloadwinetools-0.9 em RPMDownloadwinetools-0.9 em .tar.gz
After downloading the file winetools-0.9jo-III.tar.gz, and logging in as root, move the file to the directory /root and open a new shell. Inside the shell, type these instructions:
 [root@hades root]# tar -xzvf winetools-0.9jo-III.tar.gz [Enter]
 .
 . (list of files beeing unpacked)
 .
 [root@hades root]# cd winetools-0.9jo-III [Enter]

 [root@hades winetools-0.9jo-III]# ./install [Enter)]
Ready! The installation is finished. Looking at the illustration below you can see some strange messages (this can happen ;-), like command not found, but this does not affect the performance of WineTools.
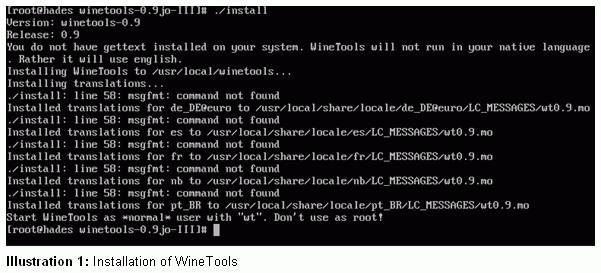
To close the installation, still logged in as root, follow the procedures listed below to download a script to use the WineTools. Open a shell and type the instructions:
 [root@hades root]# cd /usr/local/bin [Enter]

 [root@hades bin]# wget -vc https://www.reddevil.eti.br/gettext.sh [Enter]
 .
 . (receiving the file)
 .
 [root@hades bin]# chmod 777 gettext.sh [Enter]

 [root@hades bin]# exit [Enter]
Creating and managing the fake Windows (installations)
Now we will create our Fake Windows (we will call it Fake). This is necessary to run Windows applications inside Linux.
Caution! The root should never be used to work with Wine, so to this end we will use a common user, with rare exceptions, our user needing to belong to a group firebird (and while I wait our Firebird is installed and running in Linux). If you have not yet installed a Firebird server, you should do it now (https://www.firebirdsql.org) before continuing to read this article. Please refer to Download and Install Firebird for installation details.
In this article I will be using a linux user called reddevil, so when I refer to the directory ~/.wine, I will be referring to the directory /home/reddevil/.wine, OK?
Another important detail we need to determine is that Firebird is running in the localhost, or be situated on the same computer on which we are working, and running (loaded) in the default directory (/opt/firebird). If someone needs to use a remote Firebird the results will be the same, but it is necessary of course to make certain alterations correspondingly.
So, let's go! Firstly make sure you are logged in as a common user – that user will execute the windows programs. Open a shell and type the instruction. The result is presented in the illustration below.
[reddevil@hades reddevil]$ wine [Enter]
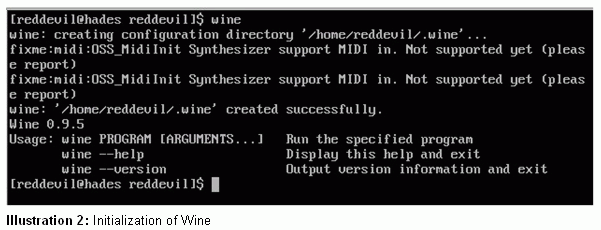
This instruction starts Wine and creates the Fake, to prepare the environment to run the WineTools.
Now, we will access the WineTools for the first time. If you are using KDE press [Alt] + [F2] or use the fbrun in the Fluxbox, or open a shell and type winetools (in lowercase). Click the OK button in the 3 initial screens and done, you are in the Main Form of WineTools, and now you have a very intuitive interface, as in illustration 3.
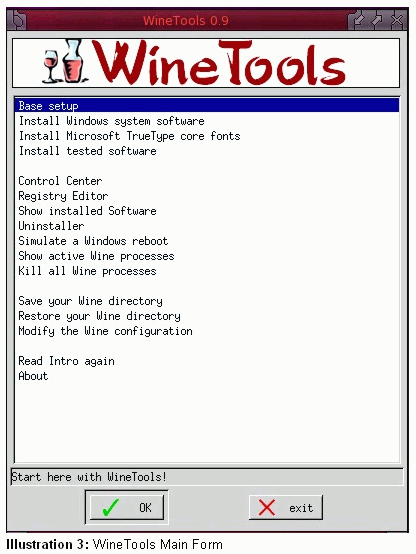
So, let´s begin by selecting the option Base setup, the first option in the WineTool's main form, this option should be already highlighted by default, if not, select it! Then click the OK button to access the menu Base Setup of WineTools, as in illustration 4.
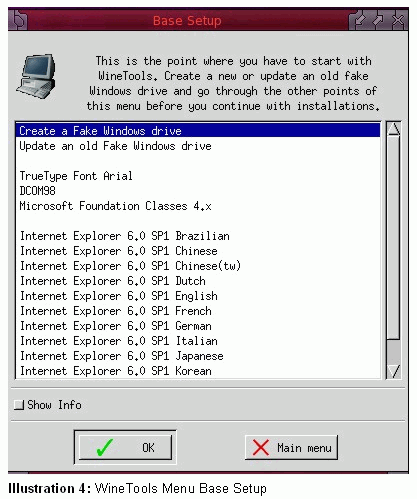
Select the option Create a fake Windows drive and confirm, answer YES to the question Remove existing Wine configuration?. Click the OK button to confirm the path of the CD ROM in /etc/fstab (or change it, if this isn’t correct) and to answer the questions What's your username? and What's your organization? you can fill in some information, like, user and home (if necessary the information can be changed in the file /~wine/system.reg). Wait for the confirmation Fake Windows drive created in ~/.wine. Click in the OK button again and wait for the Base Setup menu of WineTools.
The last procedure has created our Fake, with certain changes created when Wine is started. These changes may be altered using WineCfg and regedit. Some changes may be, for example, certain file entries in ~/.wine/*.reg and some files in the directory ~/.wine/drive_c/windows/system32. Our Fake is (or should be!) prepared to be a Windows 98, the best to run our applications.
Now we will install some programs for the Fake to work without any problems.
The first step is to install DCOM98. In the WineToolsBase Setup menu, select the option DCOM98 and click the OK button. You should see the message Downloading.
When the download is completed, proceed answer YES to the question: OK to install DCOM98 for Windows 98?, YES to the licensing terms (only if you agree of course!) and wait for the installation to finish.
In the next step we will install the Microsoft foundation Classes 4.x. In the same menu (Base Setup), select the option Microsoft Foundation Classes 4.x, confirm, and wait for the download to finish. Two DLL files will be installed and then you should return to the Base Setup menu.
To continue we now need to perform a more complex installation, namely the Internet Explorer. In the Base Setup menu, select the option Internet Explorer 6.0 SP1 English and click the OK button. You will see the information displayed in Illustration 5. Click OK to begin downloading the installer. During the installation process the download screen may be displayed too.
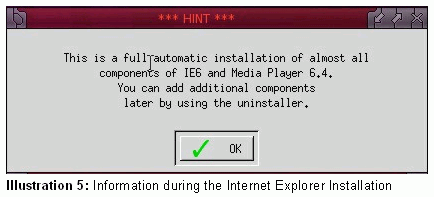
The download of the installer is fast, and when finished the installation starts automatically and begins to download the components. This process may take a long time, depending upon the power of your internet link (as much as 30 minutes or more). The following will be downloaded: Internet Explorer, Outlook Express, Windows Media Player, Macromedia Flash Player and the codecs, support for images files and VB Scripts. During the installation process of the Internet Explorer messages, such as the one displayed in illustration 6, may occur. If this happens simply click the OK button to continue.
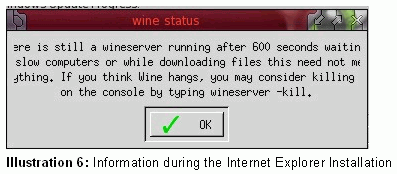
The downloaded components are subsequently installed automatically. When finished, the installation displays a message informing you that WineTools has copied some scripts into the directory bin. Click the OK button, and answer NO to the next question: Do you want to save the downloaded files for later?
Following this you are returned to the Base Setup menu.
We have now finished the installation in the Base Setup menu. So return to the Main Menu, the principal WineTools menu, and select the option Install Windows system software to access the menu System Software, displayed in Illustration 7:
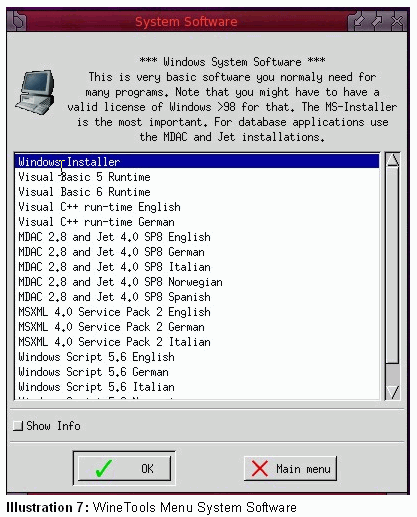
Note: You need some previous know-how regarding the installation process of WineTools. When you are in the System Software menu, select the following options and follow the instructions displayed adjacently:
Windows Installer: Click the OK button, and then YES in the ***WARNING*** message displayed and continue. When the message confirming completion of the installation process appears, click the OK button and wait for the WineTools System Software menu to be displayed.
Visual Basic 6 Runtime: Click the OK button, wait for the download and when the message Would you like to install the Visual Basic 6.0 run time files? appears, confirm (YES) and wait for the installation process to complete and then return to the System Software menu.
Visual C++ run-time English: Click the OK button, wait for the download to complete, accept the license terms and confirm YES to the question: Do you want to restart your computer now?. Wait for Wine to reboot, and the System Software menu to be displayed.
MDAC 2.8 and Jet 4.0 SP8 English: Click OK for the Hint exposed before the installation of MDAC 2.8, and wait for the download to complete. When the installation starts accept the license and proceed through the installation, selecting Next, Next and Finish. After the installation of Jet 4.0 SP8, follow the same steps for the installation of the MDAC 2.8.
Now let’s install the Microsoft TrueType core fonts. Go to the WineTools Base Setup menu, select the option True Type Font Arial, click OK, wait for the download to complete, accept the license terms and finish the installation of this font family. After this, select the option Install Microsoft TrueType core fonts, the third option in the WineTools Main Menu, and proceed with the installation of all available fonts in the same way.
Ready! The installation is complete!
Preparing the desktop
Now we will prepare our Desktop, "casting" IBExpert and the programs in our Fake, and the Firebird´s Client DLLs too, preparing our database in the Linux environment. You must have a disk partition with Windows and IBExpert installed, as well as the Firebird client on the same computer.
Before proceeding further we still have a detail to solve, namely the Wine date format used for programs. When I first began to "play" with Wine I found it hard to understand, because Wine manages date fields with the format d/m/aaaa. To use the date format dd/mm/aaaa we need to make some changes; this information was kindly provided by my friend Hamacker.
Logged in as a common user (this detail is very important) – the user you were logged-in as during the installation, open a shell and type the command:
[reddevil@hades reddevil]$ wine regedit [Enter]
This opens the Windows Register Editor. Search for the contents in the HKEY_CURRENT_USER\Control Panel\International key, and change the value of sShortDate from d/M/yyyy to dd/MM/yyyy.
Our fake windows (~/.wine) could be copied at this stage to another computer,
where, after the permissions have been changed, another user could use it, without having to reinstall all the software.
Note: The next steps need be done by a user with root rights. I prefer the KDE environment, because of the copy and paste facility for the instructions in Konsole with [Shift] + [Insert].
For the next example, I have Windows 98 installed in a FAT32 partition in the same hard drive on the same computer and I will mount this partition in the Windows flavor in the /winhd directory. This way I can show how to proceed with copying the necessary files from that Windows partition to the Linux partition where we are preparing the Wine Desktop. Open a shell and type the instructions (if necessary, change the instructions to adapt to your Windows):
 [reddevil@hades reddevil]$ su [Enter]
 Password: [root´s password] [Enter]

 [root@hades reddevil]# mount /dev/hda1 /winhd [Enter]

 [root@hades reddevil]# mkdir /home/reddevil/.wine/drive_c/programs [Enter]

 [root@hades reddevil]# mkdir /home/dados [Enter]
Now we will copy the necessary files to Linux. To make the Firebird connection we need a library to connect. If you are not sure about the software or component necessary, use only the fbclient.dll and copy this file. If you are still not sure, copy gds32.dll too to Wine's system32 directory. Be careful with lower-case: all names and extensions must be lower-case. Hamacker says Wine does not accept any mismatches.
The list 1 (below) displays the sequence of instructions used for copying the files and creating the rights:
 [reddevil@hades reddevil]$ su [Enter]
 Password: [root´s password] [Enter]

 [root@hades reddevil]# mount /dev/hda1 /winhd [Enter]

 [root@hades reddevil]# mkdir /home/reddevil/.wine/drive_c/programs [Enter]

 [root@hades reddevil]# mkdir /home/dados [Enter]

 [root@hades reddevil]# cp -r /winhd/Arquivos\ de\ programas/HK-Software/IBExpert/
/home/reddevil/.wine/drive_c/ [Enter]

 [root@hades reddevil]# cp /winhd/Arquivos\ de\ programas/Firebird/Firebird_1_5/bin/fbclient.dll /home/reddevil/.wine/drive_c/windows
/system/fbclient.dll [Enter]

 [root@hades reddevil]# cp /winhd/Arquivos\ de\ programas/Firebird/Firebird_1_5/bin/fbclient.dll /home/reddevil/.wine/drive_c/windows
/system/gds32.dll [Enter]

 [root@hades reddevil]# cp -ax /winhd/myhome/dragonegg.fbk /home/dados/ [Enter]

 [root@hades reddevil]# cp -ax /winhd/myhome/*.exe /home/reddevil/.wine/drive_c/programs/ [Enter]

 [root@hades reddevil]# cd /home/ [Enter]

 [root@hades home]# chown -R firebird.firebird dados/ [Enter]

 [root@hades home]# cd /home/reddevil/.wine/drive_c/ [Enter]

 [root@hades drive_c]# chown -R reddevil.firebird IBExpert/ [Enter]

 [root@hades drive_c]# chown -R reddevil.firebird programs/ [Enter]

 [root@hades drive_c]# chown reddevil.firebird windows/system/fbclient.dll [Enter]

 [root@hades drive_c]# chown reddevil.firebird windows/system/gds32.dll [Enter]

 [root@hades drive_c]# umount /winhd/ [Enter]

 [root@hades drive_c]# exit [Enter]
List 1: Instructions for copying and granting permissions (rights)
The exit command (above) closes our root Access and turn us into a common user in the group firebird. And this user will restore the back up of a database from the Windows partition in Linux. In the example, the database name is dragonegg.fdb:
[reddevil@hades reddevil]$ cd /opt/firebird/bin/ [Enter]
 [reddevil@hades bin]$ ./gbak -user sysdba -password senha_do_sysdba -C -V -Z -R -P
4096 /home/dados/dragonegg.fbk /home/dados/dragonegg.fdb [Enter]
 .
 .[instructions for restore]
 .
 gbak: finishing, closing, and going home
 [reddevil@hades bin]$ exit [Enter]
If you haven't installed IBExpert yet, then run it now.
Now let´s configure IBExpert to run in Wine, principally using the Multiple Document Interface (MDI):
So proceed with the following steps used to run WineTools and call the Winecfg, or, in the KDE environment, press [Alt] + [F2], or use the fbrun in the fluxbox, or open a shell and type winecfg (in lowercase).
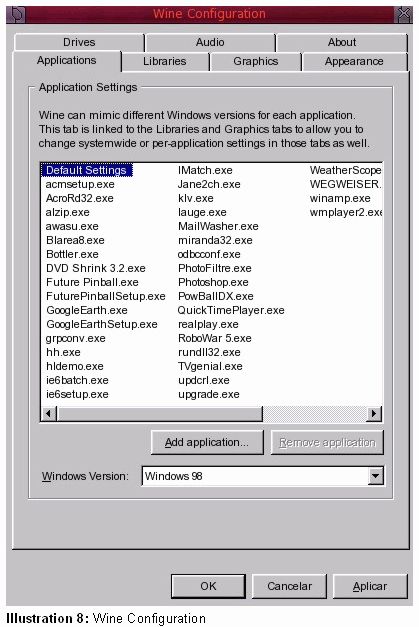
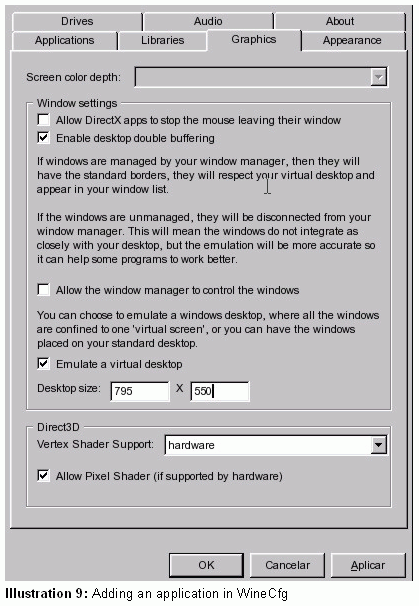
In the Wine Configuration, as seen in Illustration 8, on the Application page, select the option Add application, and in then in the form which opens, Select a Windows executable file, select the path of wine's virtualized windows environment until you reach the IBExpert folder, select ibexpert.exe and click Open. Then go to the Graphics page and uncheck the option Allow the windows manager to control the windows, check the option Emulate a virtual desktop, specify the Desktop size: 795 x 550, as seen in Illustration 9, and confirm with Apply and OK.
Alternatively type:
$ env WINEPREFIX="/home/reddevil/.win" wine "C:\Program Files\HK-Software\IBExpert\ibexpert.exe"
The same procedure can also be used for applications developed in Delphi.
With screens with resolutions of 800x600 I got a good result for IBExpert
with Desktop in 795x550. Try different configurations with your screen width.
Now open a shell and type:
[reddevil@hades reddevil]$ wine ~/.wine/drive_c/IBExpert/ibexpert.exe [Enter]
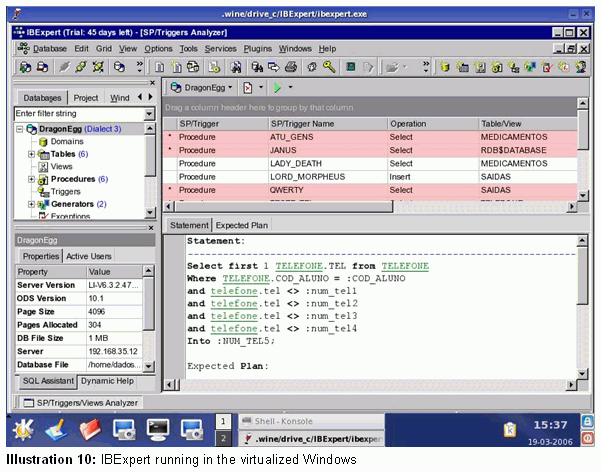
This command runs IBExpert in the virtualized Windows. The use of IBExpert will not be reported in this article. It is extremely easy and intuitive. However Wine implements an "exception" case: database access must always be made using TCP/IP. So it is important to use the TCP/IP protocol and localhost to identify the database. An example of IBExpert running in Linux KDE is displayed in Illustration 10.
In the case of Delphi applications, IBObjects users have an advantage, because they simply need to configure the component TIB_Connection and then compile the applications to run in Fake. Applications using dbExpress must have the DLLs exported for Wine.
Using IBObjects, I configure TIB_Connection changing the properties CharSet, DatabaseName (including the IP and path of the database, for example: 192.168.35.12:/home/dados/dragonegg.fdb), Username and Password.
When we install the WineTools MDAC 2.8 and Jet 4.0, there are other components installed in Fake, such as ADO, support for MS SQL Server, etc. So if you use something other than IBObjects to access Firebird you need to configure it in Wine.
And yet another problem has been detected. Some applications developed in Delphi display problems with the position of Buttons and Panels (position and sizes), as can be seen in 192.168.35.12:/home/dados/dragonegg.fdb), Username and Password.
[reddevil@hades reddevil]$ wine ~/.wine/drive_c/programs/ohades.exe [Enter]
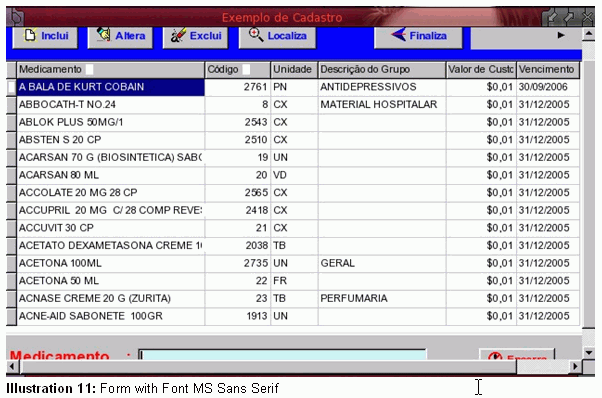
After a lot of hard work, in a moment of insanity (I live constantly on the borders of insanity and geniality :-)), I discovered the font used in the forms is MS Sans Serif (default for Delphi programs), and by changing the font to Arial the problem was solved, as displayed in Illustration 12. There is a program called ohades.exe, which you can not see in the illustration:
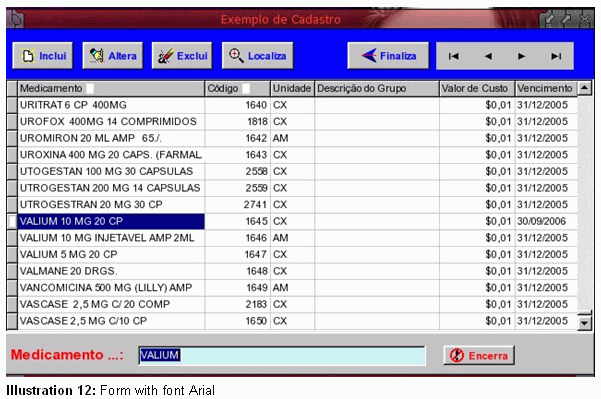
As you can see, we can call the application from the command line in a shell. I did it because someone asked about the compatibility with Linux, and still using the Fluxbox like the Windows Manager, it uses only 700KB of RAM and not the 280MB used by KDE and Gnome. As it is normal to call applications from the Graphic Interface of a Windows Manager, it is necessary to create a link for the application in the KDE or call the application from an icon in the Fluxbox, after installing iDesk. The instruction to be used in the shortcut is displayed below, but be sure the hades.exe program is in the folder ~/.wine/drive_c/programs of the Fake. There are 3 ways to call applications:
wine /home/reddevil/.wine/drive_c/programs/hades.exe(UNIX mode)wine C:\\programs\\hades.exe(Wine mode)wine "C:\programs\hades.exe"( "DOS" mode)
Note: when using the last mode, the path of the program must be specified with quotation marks (double quotations).
Acknowledgements
Author’s acknowledgements: I would like to give special thanks to Hamacker, who helped me too much and always gave me support I needed to enable me to finish this job.
We would like to thank the author, Luiz Paulo de O. Santos, for providing us with the English translation of this article, which was originally published in Linux World.
See also:
Installing on Linux
back to top of page
<< Distributed applications with Firebird | Database technology articles | Bidirectional replication for InterBase and Firebird >>


