User Manager
<< Generate HTML Documentation | IBExpert | Grant Manager >>
The User Manager administrates database users and their roles. Here individual users can be allocated database and server access. The User Manager applies to the database server and not the individual database (please refer to Server security ISC4.GDB / SECURITY.FDB for further information).
The User Manager uses SQL instead of the Services API when working with Firebird 3 databases. To take advantage of the SEC$USERS system table you may need to copy the security3.fdb to the IBExpert\IBExpert Developer Studio\IBExpert directory. All Firebird 3.0 users are then also displayed and can be maintained in the IBExpert DB Explorer
To open the User Manager select the IBExpert Tools / User Manager menu item, or click the relevant icon in the Tools toolbar.
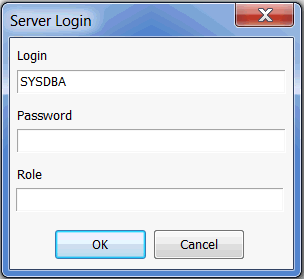
If you are already connected to a database, the User Manager will go directly to the Services Manager for that database. If you are not connected to a database, you will first need to log in to the server.
The User Manager Editor displays a list of all registered databases (drop-down list). The server connection may be altered using the drop-down list.
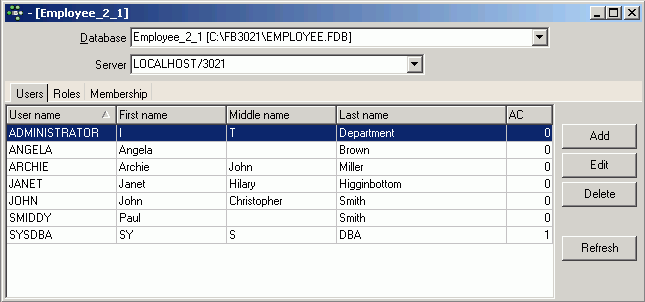
Select the database and server (local or remote) to administrate.
If the registered database is using Firebird version 2.1 or higher and the Trusted authentication option has been specified in the Database Registration Info, then Windows "Trusted User" security is also supported here.
The Active users list is retrieved from MON$ATTACHMENTS if possible.
User rights for the database
All users must be logged in, in order to access the server. What they are actually allowed to do on the server is then determined using the Firebird/InterBase® GRANT and REVOKE commands (see the IBExpert Grant Manager for details), or the front-end program.
Please note: to create, edit and delete users and roles you should have the rights of server administrator.
Users page
On the Users page, a full list of users registered for the named server connection is displayed. Even if the selected database is not currently connected, the user list can still be seen. This is because the users are registered directly in the security database on the server, and can therefore be granted rights for all databases on this server. The AC (Active Users) column shows how many active connections a user has to the specified database. This works only with active databases. The Refresh button has been added (bottom right) to refresh the list of all users.
You may be asked for a password, when selecting an unconnected database in order to ascertain your authority.
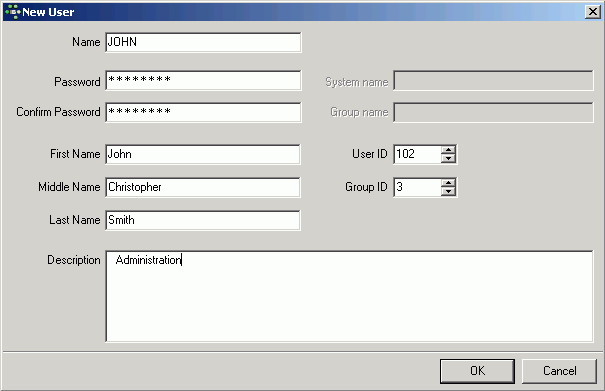
A user can be added by the SYSDBA (not the database owner, as users are created for all databases on the server). Simply click the Add button, and complete the New User form:
InterBase® 7.5 embedded user authentication is also supported.
Again, only the SYSDBA is allowed to edit or delete users. When editing, only the user name used for logging in may not be changed. It is here that a new password may be entered if the user has forgotten his old one; or a change of name be necessary, for example, if a user marries.
This list contains all current users. To add, edit or delete users use the buttons at the right of the list. In the Add / Edit User window set the user name and password and (optionally) his first, middle and last name.
Password
The password is always user-oriented. Passwords are stored encrypted in the server database. When a user enters his password, this is passed onto the server, which compares the string entered with the string of the encrypted password stored on the server. The password is NEVER passed on from the server to the client.
If a user forgets his password, the SYSDBA can enter a new one to replace the old one. Alternatively a UDF can be incorporated into the program, to allow the user to change his password himself, without having to disturb the SYSDBA or reveal the new password to a third person. An example of such a UDF can be found in the FreeUDFlib.dll, which can be downloaded from https://www.ibexpert.com/download/udf/.
Users can be entered and assigned rights directly (using IBExpert's Grant Manager), although it often makes more sense if the majority of users are assigned user rights using roles. Roles are used to assign groups of people the same rights. When changes need to be made, only the role needs to be altered and each user individually.
Roles page
The Roles page can be used to create and delete roles exactly in the same way as with the database object roles. All roles and their owners are displayed for the selected database. Other databases on the same server may be selected to display their full range of existing roles.
Firebird 4 cumulative roles and default roles are also supported.
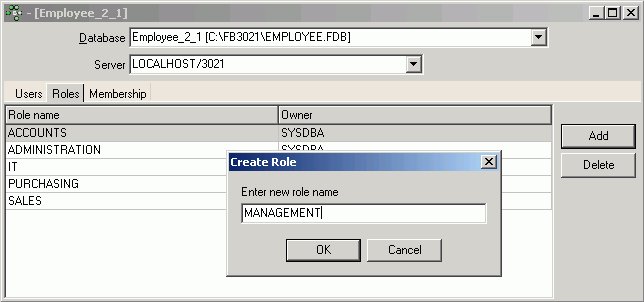
To add or delete roles click buttons at the right of the list. When creating or deleting a role the Compile window appears. Commit the transaction and if it is successful the new role is created or dropped. After the role has been created, users need to be added to the role (please refer to Membership page below). Role users and rights can then be specified, edited and deleted using IBExpert's Grant Manager.
Roles can only be altered at system table level. They can however be deleted and new roles added using the User Manager.
Membership page
The Membership page shows on the first page, Users -> Roles, which users have been granted rights to which roles and, on the second page, Roles -> Users, a list of all roles and which users have been assigned which rights to them.
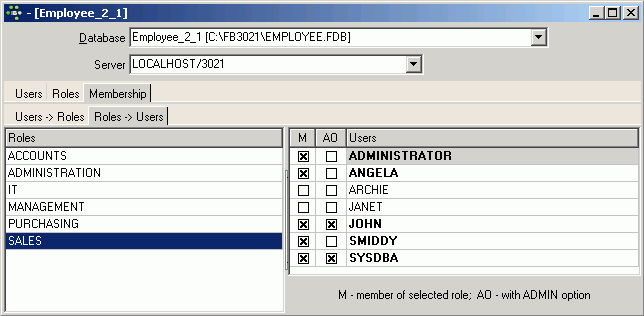
The abbreviations G stands for Granted, M for Member of selected role and AO for With ADMIN option. Users can be assigned roles simply by selecting the user, and checking either the Grant/Member of selected role boxes or the Admin option box. For example, all sales staff could be given the user name SALES with the role SALES. When logging into the system, both these names need to be entered. Checking the Admin Option automatically entitles the user to pass his rights on to other users.
These pages also display Windows users (when trusted authentication is used), and show users which are absent in the security database but still present in RDB$USER_PRIVILEGES.
Server security ISC4.GDB / SECURITY.FDB
When Firebird/InterBase® is installed on a server, a database of authorized users is also installed. This is vital for server security, to protect the server from being accessed, manipulated or damaged by unauthorized users.
The database's security database is called ISC4.GDB; since Firebird 1.5 SECURITY.FDB, the change of suffix being due to Windows XP's eternal copying problems with .GDB files. The SECURITY.FDB was renamed SECURITY2.FDB in Firebird 2.0 (please refer to Server security SECURITY2.FDB below for details of the main changes).
The ISC4.GDB provides a user page detailing rights for the Firebird/InterBase® server. Here all users are entered that are allowed to use the server. The user password is server-oriented and not database-oriented. It is important to employ users and rights to limit access and control manipulation, and is particularly advantageous, for example, to trace who has done what and when, as user names are included in the log.
Any user listed in the server security database's user list can open a database by providing the appropriate user name and password. If a user name and password is specified when the database is created, this user becomes the database owner. Only the SYSDBA and database owner are allowed to drop the database. If no database owner is specified at the time of database creation, then only the SYSDBA is authorized to drop the database.
If a user creates a table, Firebird/InterBase® appoints that user as the table owner, and only the table owner and the SYSDBA are authorized to drop the table.
The SYSDBA and database owner can GRANT, REVOKE and grant access rights to users in the database; the SYSDBA and table owner can GRANT, REVOKE and grant access rights for tables. These rules also apply to views and stored procedures.
Simply allowing users into the database is not particularly helpful if they have not been granted access to the objects in this database. Therefore server security is administrated in IBExpert using the User Manager; user rights can then be assigned and controlled using the IBExpert Grant Manager.
Further security features include the following:
- Views: as they can be used to hide many table details from users; the users only have access to those columns and rows that they really need to see.
- Referential integrity: protects the data against orphaned rows and other operations, which could possibly damage the database integrity (please refer to Referential integrity for further information).
- GRANT and REVOKE statements: can be used in the IBExpert Grant Manager to specify which users may access which tables and views, and whether they are also allowed to manipulate data.
- An object may not be dropped if it is referenced elsewhere in the database. For example, a table cannot be dropped if it is referenced in a view, check constraint, trigger, stored procedure or other object.
Server security SECURITY2.FDB
The Firebird 2.x security database has been renamed security2.fdb. Inside, the user authentication table, where user names and passwords are stored, is now called RDB$USERS. There is no longer a table named "users" but a new view over RDB$USERS that is named "USERS". Through this view, users can change their passwords.
For instructions on updating previous security databases, refer to the section Dealing with the new security database at the end of this section.
The following is a summary of the major changes, the details of which can be found in the Firebird 2.0.4 Release Notes in the Security in Firebird 2 chapter:
- Better password encryption
- Users can modify their own passwords
- Non-server access to security database is rejected
- Active protection from brute-force attack
- Vulnerabilities have been closed
Classic Server on POSIX
The main reason to restrict direct access to the security database was to protect it from access by old versions of client software. Fortuitously, it also minimizes the exposure of the embedded Classic on POSIX at the same time, since it is quite unlikely that the combination of an old client and the new server would be present on the production box.
Caution: However, the level of Firebird security is still not satisfactory in one serious respect: an important security problem with Firebird still remains unresolved: the transmission of poorly encrypted passwords "in clear" across the network. It is not possible to resolve this problem without breaking old clients.
The immediate problem can be solved easily by using any IP-tunneling software (such as ZeBeDee) to move data to and from a Firebird server, for both 1.5 and 2.0. It remains the recommended way to access your remote Firebird server across the Internet.
Dealing with the new security database
If you try to put a pre-Firebird 2 security database, security.fdb or a renamed isc4.gdb, into Firebird's new home directory and then try to connect to the server, you will get the message "Cannot attach to password database". It is not a bug: it is by design. A security database from an earlier Firebird version cannot be used directly in Firebird 2.0 or higher.
In order to be able to use an old security database, it is necessary to run the upgrade script security_database.sql, that is in the ../upgrade sub-directory of your Firebird server installation, or in the Appendix to Firebird 2 Release Notes to these notes: Security Upgrade Script.
Doing the security database upgrade
To do the upgrade, follow these steps:
- Put your old security database in some place known to you, but not in Firebird's new home directory. Keep a copy available at all times!
- Start Firebird 2, using its new, native security2.fdb.
- Convert your old security database to ODS11 (i.e. backup and restore it using Firebird 2.0). Without this step, running the security_database.sql script will fail!
- Connect the restored security database as SYSDBA and run the script.
- Stop the Firebird service.
- Copy the upgraded database to the Firebird 2 home directory as security2.fdb.
- Restart Firebird.
Now you should be able to connect to the Firebird 2 server using your old logins and passwords.
Nullability of RDB$PASSWD
In pre-2.0 versions of Firebird it was possible to have a user with NULL password. From v.2.0 onward, the RDB$PASSWD field in the security database is constrained as NOT NULL.
However, to avoid exceptions during the upgrade process, the field is created as nullable by the upgrade script. If you are really sure you have no empty passwords in the security database, you may modify the script yourself. For example, you may edit the line:
RDB$PASSWD RDB$PASSWD,
to be
RDB$PASSWD RDB$PASSWD NOT NULL,
Caution with LegacyHash
As long as you configure LegacyHash = 1 in firebird.conf, Firebird's security does not work completely. To set this right, it is necessary to do as follows:
- Change the SYSDBA password.
- Have the users change their passwords (in 2.0 each user can change his or her own password).
- Set LegacyHash back to default value of 0, or comment it out.
- Stop and restart Firebird for the configuration change to take effect.
Source: Firebird 2.0.4 Release Notes
Changes to security2.fdb in Firebird 2.5
Since Firebird 2.5, automatic SYSDBA mapping is controlled on per-database basis using the new SQL command
ALTER ROLE RDB$ADMIN SET/DROP AUTO ADMIN MAPPING
Note: For a full overview of the RDB$ADMIN role, refer to the topic New RDB$ADMIN system role in the Administrative Features chapter.
Source: Firebird 2.5 Release Notes: Security hardening
See also:
Firebird 2.5 Quick Start Guide: Security
Change user password per batch
To alter a user's password at command-line level, use the following syntax:
gsec -modify SYSDBA -pw password
or:
gsec -user SYSDBA -password oldpassword -modify SYSDBA -pw newpassword
An example for a batch:
 set isc_user=sysdba
 set isc_password=masterke
 gsec -add username -pw password
See also:
Role
WITH ADMIN OPTION
REVOKE ADMIN OPTION FROM
Firebird Password File Utility
GSEC
Referential Integrity
back to top of page
<< Generate HTML Documentation | IBExpert | Grant Manager >>


